How to create Ionic Segment Button in Angular using Signals
In this tutorial, we will create an Ionic Segment Button in Angular 17 using Signals. Ionic Segment Button is a group of buttons that are used to toggle between multiple options. The user can select only one option at a time. The selected option is highlighted and the other options are dimmed.
I’m using tailwindcss for styling. You can use any other styling framework or plain CSS.
Example Usage
export class AppComponent {
	selected = signal('first')

	constructor() {
	}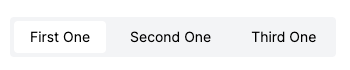
}<segment-group [value]="selected">
<segment-button value="first">First One</segment-button>
<segment-button value="second">Second One</segment-button>
<segment-button value="third">Third One</segment-button>
</segment-group>Steps to create the component
- Create a new Angular project
- Create a new
segment-groupcomponent - Create a new
segment-buttoncomponent - Add the
segment-buttoncomponent to thesegment-groupcomponent - Add the
segment-groupcomponent to theapp.component.htmlfile - Add the
placesignal to theapp.component.tsfile
Segment Group
segment-group.component.html
<div class="flex gap-2 bg-gray-100 rounded p-1 max-w-max">
    <ng-content></ng-content>
</div>
segment-group.component.ts
import {Component, ContentChildren, effect, Input, QueryList, signal, ViewEncapsulation} from '@angular/core';
import {NgClass} from "@angular/common";
import {SegmentButtonComponent} from "./segment-button/segment-button.component";

@Component({
	selector: 'segment-group',
	standalone: true,
	imports: [
		NgClass
	],
	templateUrl: './segment-group.component.html',
	styleUrl: './segment-group.component.css',
	encapsulation: ViewEncapsulation.None
})
export class SegmentGroupComponent {
	@Input() value = signal('');
	@Input() disabled: boolean = false;

	@ContentChildren(SegmentButtonComponent) buttons: QueryList<SegmentButtonComponent> | undefined;

	constructor() {
		effect(() => {
			if (this.buttons && this.value()) {
				this.buttons.forEach(button => {
					button.selected = (button.value === this.value());
				})
			}
		});
	}

	ngAfterContentInit() {
		if (this.buttons) {
			this.buttons.forEach(button => {
				button.click.subscribe(() => {
					this.value.set(button.value);
				})

				if (this.disabled) {
					button.disabled = true;
				}
			})
		}
	}

}
Segment Button
segment-button.component.html
<button type="button"
        class="rounded px-4 py-1.5 text-sm font-medium disabled:opacity-80 disabled:cursor-not-allowed"
        [ngClass]="selected ? 'bg-white' : ''"
        (click)="click.emit($event)"
        [disabled]="disabled"
>
    <ng-content></ng-content>
</button>
segment-button.component.ts
import {Component, EventEmitter, Input, Output, ViewEncapsulation} from '@angular/core';
import {NgClass} from "@angular/common";

@Component({
	selector: 'segment-button',
	standalone: true,
	imports: [
		NgClass
	],
	templateUrl: './segment-button.component.html',
	styleUrl: './segment-button.component.css',
	encapsulation: ViewEncapsulation.None
})
export class SegmentButtonComponent {
	@Input() value: string = '';
	@Input() selected: boolean = false;
	@Input() disabled: boolean = false;

	@Output() click = new EventEmitter();

	constructor() {
	}

}
Thats it. I hope you found this tutorial helpful.